Introduction
I’m writing this article mostly for my future self since I already did this kind of expansion twice in the last year and had to waste a lot of time finding this solution online.
Most of the articles found on Google deal with Ubuntu guest VMs that have some sort of graphical user interface.
Coming from a Windows background and not having experienced a Linux host, I found that a Linux GUI inside a VM (be it VirtualBox, Hyper-V or VMware) is not snappy enough for me. So I went the Ubuntu Server with no GUI way.
My setup
Host OS: Windows 10 Pro.
Virtualization software: VirtualBox.
Guest OS: Ubuntu Server 20.04 LTS.
The install is the default one with no drive encryption since it’s usually a practice VM with no important data.
Install steps
Pre-requests
- Access to virtualization software
- Sudo role
- Cfdisk utility (is usually pre-installed in Ubuntu LTS)
TLDR steps:
Sequentially increase the following:
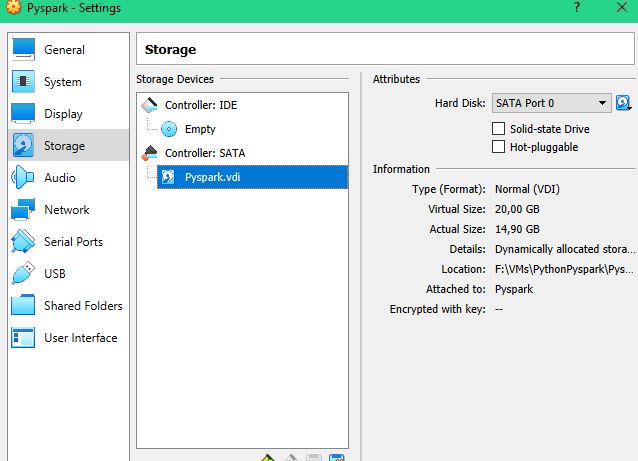
- VDI size: host Virtual Media Manager –> Go to details
- Physical Volume –> Go to details:
sudo cfdisk–> Go to detailssudo pvresize <your phisical volume>–> Go to details
- Volume Group (optional):
sudo vgextend<your volume group><your phisical volume>–> Go to details - Logical Volume:
sudo lvresize -l +100%FREE <your logical volume>–> Go to details - Filesystem:
sudo resize2fs <your filesystem>–> Go to details
1. Increase VDI size
This step will go according to your virtualization software. Virtualbox has a straight forward GUI (Virtual Media Manager) which helps you do it easily outside the VM:
From this point forward the steps have to be done inside the VM (be it through the virtualization software interface or a SSH utility).
2. Increase Physical Volume:
This step uses 2 Ubuntu built-in utilities: Cfdisk and pvresize
a. Cfdisk (sudo cfdisk) will automatically detect the increased VDI image and the operations are pretty much straight forward : resize and write to disk.
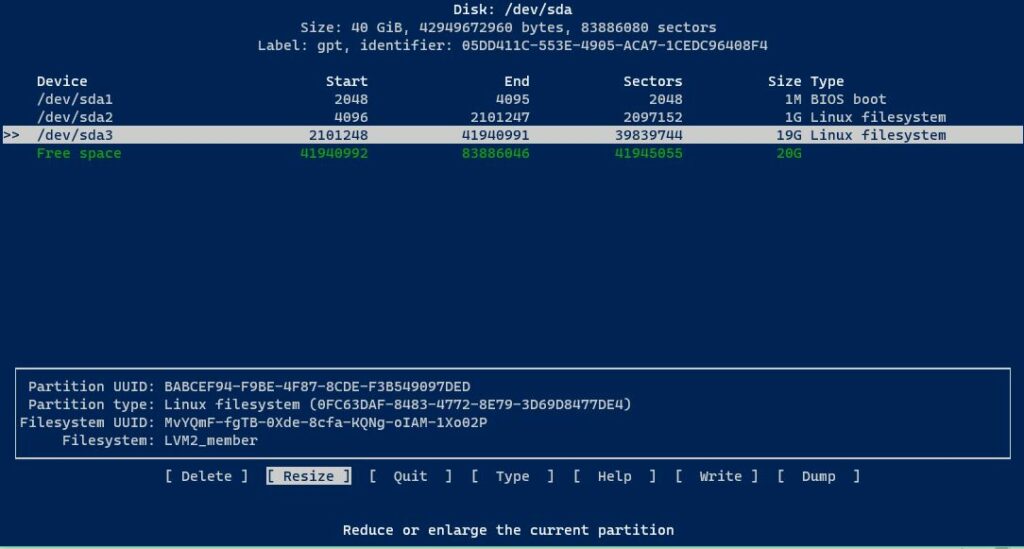

b. After you exit the Cfdisk utility you’ll have to use the pvresize command to increase physical volume (in my case: sudo pvresize /dev/sda3).
3. Increase Volume Group (optional)
This is an optional step since in Step 2 (Increase physical volume) you can create a brand new physical volume instead of resizing one of the original ones as I did.
A more detailed tutorial about this can be found in steps 5 and 6 of this article: https://brianchristner.io/how-to-resize-ubuntu-root-partition/
4. Increase Logical Volume
At this point, the command <sudo fdisk -l> should highlight the difference between the physical and logical volume in size:
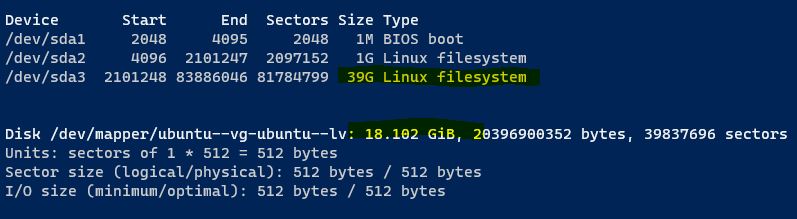
Increasing the logical volume is done by the following command:
sudo lvresize -l +100%FREE <your logical volume>

The result speaks for itself:
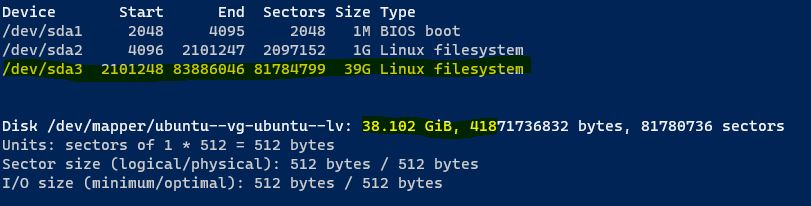
5. Increase Filesystem
The final part of this tutorial is where we make the entire space available to the operating system:
sudo resize2fs <your filesystem>
Thanks to these pages:
https://dev.to/schollii/expand-disk-in-virtualbox-ubuntu-18-guest-24eo
https://brianchristner.io/how-to-resize-ubuntu-root-partition/